By Suneha
Guide

img source: Canva
In this blog on how to remove color from image, we will teach you the basics of removing color from an image. Removing color from an image can be done for several purposes, such as business, e-commerce, and personal reasons. Removing color can create a vintage effect and emphasize certain aspects of the Image, like its centrality and subjects.
In this tutorial, we will guide you through the basics of how to remove color from an image using Photoshop. Photoshop is an excellent software for editing photos and expanding your knowledge of techniques, photo tools, etc. There are several tools in Photoshop that can remove color from an image (especially backgrounds). We will show you three different ways to remove color from an image using Photoshop, which include the use of the Magic Wand Tool and the Color Range Tool.

Method 1: Using the Magic Wand Tool to remove color
Step 1: Open Photoshop and upload an image. Search for the Magic Wand Tool in the Toolbar. It looks like a wand icon. If the wand cannot be located, click on the Quick Selection Tool. Hold on to the Quick Selection tool for a few seconds, revealing the Magic Wand Tool. You can also access the Magic Wand tool by pressing the latter 'W'.
Step 2: The Magic wand tool is used to select chunks of similar colors to create a new selection. It will work depending on the type of color you choose. Hence, modify the Tool settings depending on the color you want to apply to the magic wand tool. Adjust as you need if you think that your initial selection is not perfect.
Adjusting tolerance to a higher value selects a broader range of colors and lowering it narrows its scope. Anti-aliasing is applied to smoothen the edges of your selection, making it look natural. Enabling or disabling the Contiguous Option will determine whether adjacent pixels with similar colors will be selected or not.
Step 3: Click on Alt (Windows) or Option (Mac) to click on the color you want to remove from the Image. The Magic tool will miss a few spots. You can add to the current selection by holding the Shift key to include additional colors you want to remove.
Step 4: Once your selection is done, click on Delete.
This method will allow you to remove a color, but you can't make modifications. Hence, having a Layer Mask over the Image is helpful for future adjustments.
With the Layer Mask selected, click the Option Add Layer Mask button. Clicking on it will reveal a white layer mask.

Method 2: Using the Color Range Tool
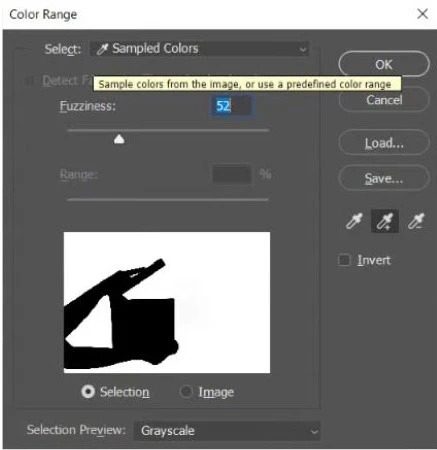
Step 1: The Color Range tool uses the eyedropper tool to get colors from your shot. This allows a selection of the same color, making this tool much more precise than the Magic Wand Tool. Ensure that the Selection Preview from the Color Range box is selected as Grayscale.
Step 2: Set the image preview to 'Selection'.
Step 3: Click on the image area that contains the color. This creates a base color. In the Color Range dialogue box, click on the Fuzziness slider to select the range of colors you want to select. A higher value allows for the selection of a broader range of colors.
Select the Preview option to see a selection of your Image that needs adjustment. Hold on to the Shift key to add additional areas. To remove areas, click on the Alt button. Once satisfied, click OK to convert the preview into a selection.
Make sure to Deselect the selection to work on the entire Image again after you have worked on the selection. To do this, go to the Select Menu and choose 'Deselect' or press Ctrl+D for Windows users or Cmd+D (Mac).
Save the Image once you are done with the selection.
Step 4: Press the delete key to remove the selection permanently. This will delete a specific color from Photoshop and this cannot be modified.
Canva allows you to remove color from images. Here is how you can remove color from an image.
Step 1: Open Canva and Upload the Image to Canva. Ensure that the Image has a black outline because this technique works for images with black outlines.
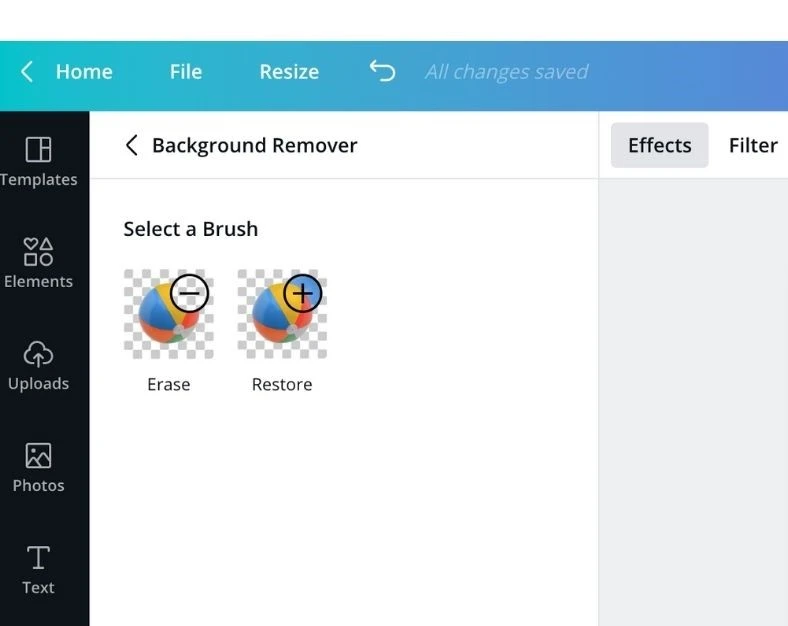
Step 2: Remove the background of your Image by clicking on Image> Effects> Background Remover tool. This tool is available only for Canva Pro users.

Step 3: Click on the Image and choose effects. Select the Photogenic button, scroll to the Mono option, and choose Classic Effect.
Step 4: After this, choose the Image and adjust the option located at the top. Edit the contrast and brightness of the Image to 100.
With this, the color has been removed from the Image.

img source: Fotor
You can easily remove color from an Image using any Online application. Fotor is a beginner-friendly and easy-to-use application.
Step 1: Open Fotor and click on the Remove color of Image Now button.
Step 2: Upload the Image. Fotor will automatically remove the background color from the Image in an instant.
Step 3: Download and save the image with a transparent background.

img source: Fotor
Removing color from an image can be done for various needs and reasons.
1. Highlighting important aspects - By removing the color from an image, a cohesive look is achieved, which allows some elements of an image to be given more stress. Artists do this to draw more attention to specific subjects within the Image.
2. Uniformity - Removing color from an image creates a uniform look, which is very helpful in presentations.
3. Stress upon Composition - Removing color from an image helps spectators focus on other elements of the image, like composition, shapes, and textures. This is done to reduce distraction from colors.
4. Experimentation with techniques- Artists and photographers who wish to experiment with techniques for fun, gain knowledge, and convey specific emotions in an image can experiment with color by removing it from an image. This is often done to experiment with different styles to determine what artistic preferences and forms of creative expression can be utilized.
We hope that the tutorial on how to remove color from image was helpful for you in expanding your knowledge.